Oil painting underpainting: essential preparation checklist
Your fantasy oil painting will not survive the test of time on charm alone. The flashiest focal point, the most cinematic lighting, the boldest composition — none of it holds if the underpainting was treated like a throwaway step.
We've all seen it: a gorgeous dragon study online, six months later the highlights have cracked, the shadows have chalked off, and the whole thing has that bruised, sickly look. That's not bad luck. That's a ground that wasn't built to carry paint.
This checklist is for illustrators who actually want their work to last — not just photograph well for a portfolio post. The mechanics are unglamorous. Sealing graphite. Mixing binders. Waiting for layers to dry. But skip them, and your visual hierarchy collapses faster than a one-pane storyboard with no setup. Below is the prep sequence that keeps the structural layers of a traditional oil piece stable enough to support whatever narrative weight you stack on top.
Securing the Graphite Foundation: Sealing and Isolation
Every oil painting underpainting starts with the sketch, and every sketch starts with graphite that wants to betray you. Carbon particles in pencil lines are loose. Leave them unbound, and they'll migrate upward through your transparent oil glazes like gossip through a small town — muddying your whites, dirtying the focal point, killing the clarity that made the composition sing in the first place.
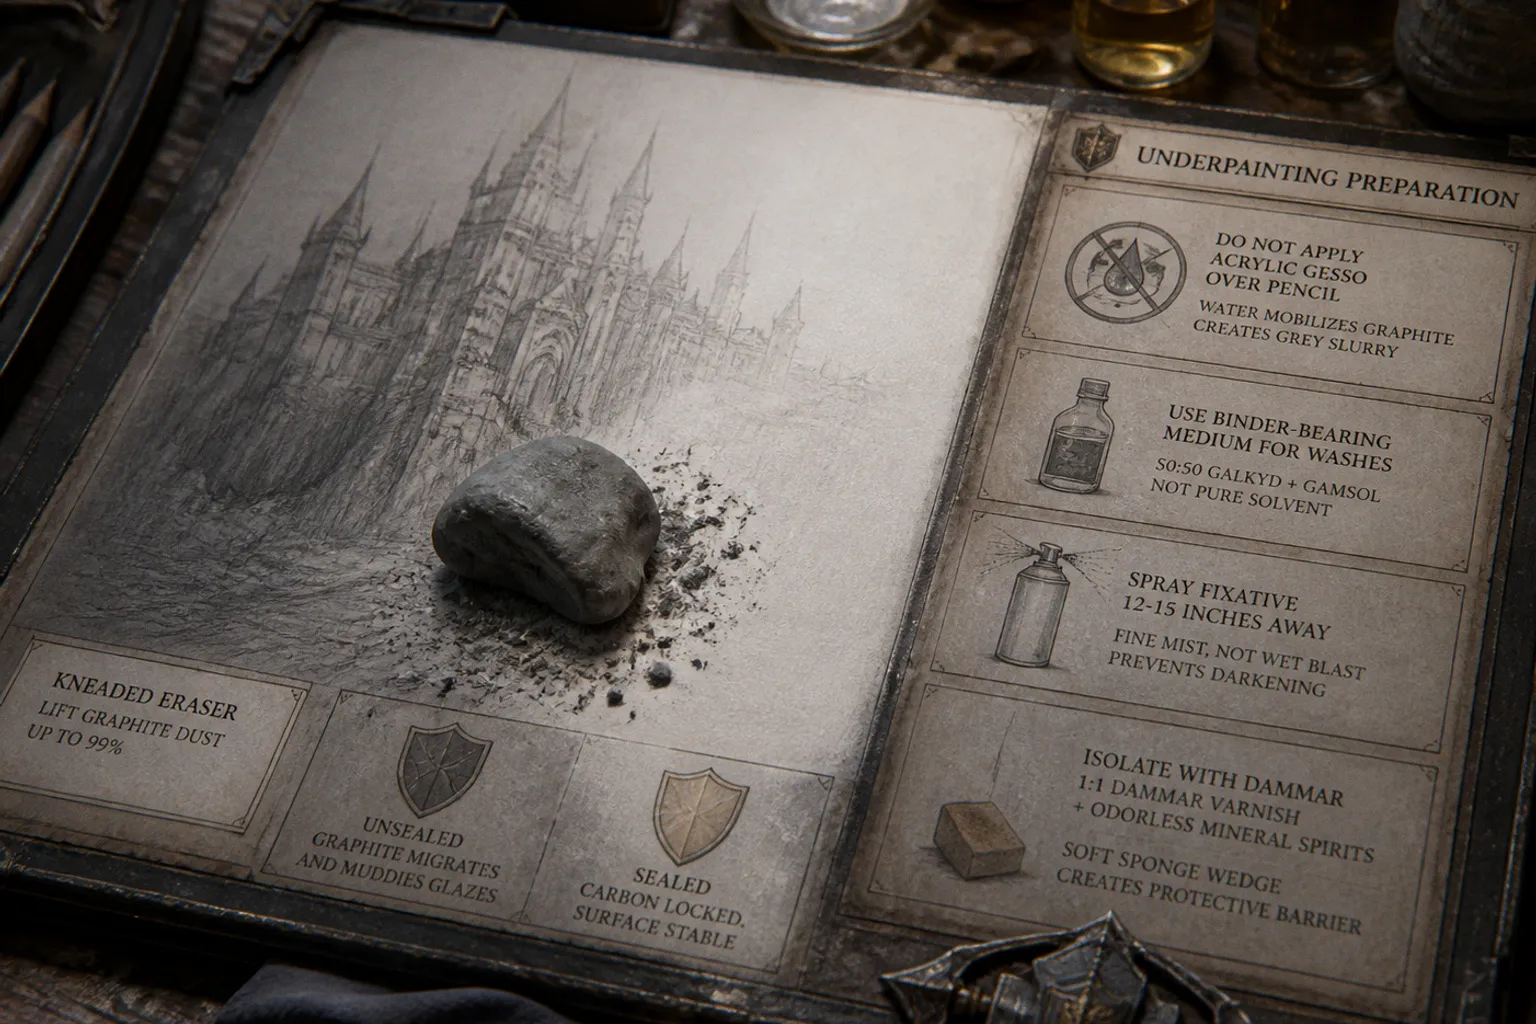
The fix isn't complicated. Roll a kneaded eraser gently across the drawing first. Done right, this lifts up to 99% of the unbound carbon without damaging your structural lines. Press too hard and you erase your own composition. Press too lightly and you've wasted a step. The motion is a soft lift — let the putty do the work, not your thumb.
Then seal it. Standing roughly 12 to 15 inches from the surface, apply a fine mist of fixative — but only one that the manufacturer explicitly rates as compatible with oil paint. This is not a minor detail. Many workable fixatives are formulated for graphite-and-charcoal workflows that terminate in soft pastel or acrylic. They may contain resins or plasticizers that sit between your underdrawing and your oil layers as an unpredictable barrier — one that can cause beading, poor adhesion, or chemical interaction that won't show up for months. Read the label. Check the manufacturer's technical data sheet. If the product doesn't say “compatible with oil paint layers” on its own documentation, don't trust it with your ground.
Spray distance matters regardless of which fixative you choose. Closer than 12 inches and you're blasting graphite into a wet pool that darkens and concentrates exactly where you don't want it. Further than 15 inches and you're spraying the air. The mist should settle, not strike — two or three light passes rather than one heavy one.
A graphite underdrawing is a story setup. Lock it in before you start layering plot twists.
Here's where most illustrators self-sabotage: they reach for acrylic gesso to seal the pencil. Don't. The water content in acrylic gesso can mobilize graphite, creating a grey slurry that ruins the ground before the first wash goes down. You wanted a clean isolation layer; you get a dirty tie-dye. Use an isolating medium or a fixative rated for oil over it — not a water-based sealer that re-wets the very carbon you're trying to trap.
The goal is not to make the graphite disappear completely. A visible construction drawing can be useful during the first value passes, especially when the image depends on complex anatomy, armor, architecture, or overlapping forms. The goal is to stop loose particles from becoming part of the paint film in places where you did not intend them to be. Keep the drawing legible where it serves the composition, but remove the excess dust and bind what remains.
A light isolation layer also changes the way the first wash behaves. Without it, the wash may pick up graphite as the brush moves across the surface. That contamination is easy to miss in a dark passage and obvious in a pale one. A warm grey or cool flesh tone can turn unexpectedly dirty because the brush is not only moving paint; it is redistributing the drawing underneath.
The Binder Dilemma: Why Solvent-Only Washes Fail
Once the graphite is locked down, the next trap is the wash. There's a persistent myth in illustration circles that you can thin oil paint with straight solvent for the underpainting. You can. You just shouldn't.
Solvent-only washes lack binder. No binder means the pigment has nothing to hold onto once the solvent flashes off. Result: chalking, flaking, adhesion so weak that your next layer peels off like a bad sticker. The painting looks fine on day one. By month six it's a casualty report, and by year two it's a footnote in your own learning curve.
The fix is a binder-bearing medium. A 50-50 blend of Galkyd and Gamsol gives you a wash that flows, grips, and dries into a stable film. The alkyd resin does the binding work the solvent can't. You get the transparency of a wash without the structural failure of a shortcut — exactly what an underpainting needs to set up the value structure for everything that follows.
The useful distinction here is between thinning and weakening. Solvent thins paint, but it does not replace the binder that makes the pigment cohere. A wash should be fluid enough to move quickly through the composition, yet still leave behind a connected film when the carrier evaporates. If it dries to a powdery or easily disturbed surface, the mixture was too lean for the job.
This is also where the fat-over-lean rule stops being theory and starts being physics: every subsequent layer must carry more oil than the one beneath it. Your wash is lean. Your color layers are fatter. Violate the order and the top dries slower than the bottom — which is a one-way ticket to cracking, cupping, and a composition that buckles under its own ambition.
That does not mean every layer needs to feel visibly oily. Underpainting is often at its best when it stays restrained: a thin value map, a controlled temperature statement, a few decisive indications of reflected light. The medium should support that economy rather than turn the first pass into a glossy miniature painting. Too much medium can make the surface slick, reduce control, and create a false sense of finish before the drawing and values have earned it.
A practical wash sequence is simple:
1. Mix the pigment into a binder-bearing medium rather than relying on solvent alone.
2. Test the mixture on a scrap of the same prepared support.
3. Check that the dried passage is attached, not dusty, greasy, or excessively glossy.
4. Establish the large value relationships before chasing local color.
5. Let the wash settle into a stable film before adding a denser paint layer.
The test patch matters because the same recipe behaves differently on a sealed panel, an acrylic ground, and a more absorbent surface. The support is part of the mixture whether you intended it to be or not.
Panel Preparation and Barrier Layers for Archival Stability
The support matters as much as the paint. For fantasy illustration with fine detail — the kind of work where a single misplaced highlight can wreck a focal point — rigid panels beat stretched canvas every time. No flex, no give, no canvas tooth fighting your smooth gradations. A typical 3mm MDF sheet provides the rigidity without the weight of a heavy cradle board, and it takes a sealer cleanly.
But raw MDF, hardboard, or any wood-based panel needs a barrier before paint touches it. The cellulose fibers drink oil like a sponge drinks water, and given enough time they'll rot the support from the inside out. On paper the rule applies with even less forgiveness: raw paper must be sealed with a barrier such as a PVA size to isolate the fibers and acrylic gesso to create a stable ground, or oil paint will damage the cellulose structure and turn an archival piece into compost.
Panel preparation is where a lot of otherwise careful work becomes casual. The front surface may look smooth, but the edges and reverse still expose vulnerable material. A rigid support can take on moisture unevenly, and an unsealed edge remains a route for oil and environmental humidity to move into the board. Sealing the working face is the minimum. Preparing the edges and back gives the panel a more consistent structure and reduces the chance that the support behaves differently around its perimeter.
For panels in a classical sealing workflow, a 1:1 mixture of dammar varnish and odorless mineral spirits — applied with a soft sponge makeup wedge — creates an isolating film that prevents oil washes from sinking into the support. The sponge wedge is the unsung hero here: it lays the film down evenly without leaving brush marks that would telegraph through your thin washes later. Brush-applied sealers look fine until your first transparent glaze reveals every streak.
The application should be thin and even. A heavy seal coat can remain soft or uneven, while a patchy coat gives the oil paint a map of different absorption rates. That map shows up as alternating dead and glossy passages, especially in broad dark areas. Work with the panel level, watch the edges for pooling, and allow the surface to settle before deciding whether it actually needs another pass.
| Step | Material / Method | Key Ratio or Distance | Failure Mode If Skipped |
|---|---|---|---|
| Graphite cleanup | Kneaded eraser | Gentle roll, light pressure | Loose carbon migrates into glazes |
| Sealing sketch | Oil-compatible fixative | 12–15 inches spray distance | Graphite pools, darkens, or mobilizes |
| Wash medium | Galkyd + Gamsol | 50 / 50 blend | Chalking, flaking, poor adhesion |
| Panel sealing | Dammar varnish + OMS | 1:1 ratio | Oil sinks and the support remains vulnerable |
| Glossy ground fix | Alkyd medium or linseed oil | Minimum 5% alkyd or 10% linseed | Paint slides or the layer separates |
The table isn't decorative — it's the cheat sheet for the ratios and distances that decide whether your ground behaves predictably. Get them wrong and the painting finds the weakness on its own schedule.
Smoothness is also a design decision. A polished panel supports controlled edges, tiny transitions, and clean atmospheric passages. A lightly toothy ground catches more pigment and can make a first wash easier to manipulate. Neither surface is automatically superior. The problem is an accidental surface: one section polished, another absorbent, another carrying brush ridges from the sealer. In a detailed fantasy image, those differences become visible as changes in handling rather than intentional changes in the scene.
Managing Drying Times and Acrylic-to-Oil Transitions
Here's where discipline separates illustrators who ship work that lasts from those who don't. Acrylic dries fast. Oil dries slow. Stack them wrong and you've built a time bomb with a three-week fuse.
If you're using an acrylic ground or acrylic underpainting beneath your oils, the acrylic must be fully cured before the oil goes on. Thin acrylic underpainting layers require at least 3 days to dry — and “dry to the touch” is not “dry enough.” Thick applications can take 2 to 3 weeks to ensure complete water evaporation before applying oil paint. Skip the wait and the trapped moisture pushes up through your oil layers, creating haze, dullness, micro-bubbles, and adhesion failure across the focal area.
The important word is cured, not merely dry. A surface can stop feeling tacky while moisture remains deeper in a thick passage. It can also feel ready in a warm, dry studio and behave differently in a cooler or more humid one. Thickness, ventilation, temperature, and humidity all affect the waiting period. If the acrylic layer is unusually heavy, the sensible response is not to trust the calendar blindly; give it more time and test an inconspicuous area.
The reverse is even worse. Acrylic paint cannot go over an oil underpainting. Ever. It's the one rule with no exceptions, no clever workarounds, no “but I saw someone on YouTube...” It's a fundamental violation of how oil paint cures, and the result is cracking within months. If you want to layer acrylic over an underpainting, the underpainting must be acrylic too — and you're now in a hybrid system with its own rules and its own failure modes.
The illustration trap here is impatience. You block in a composition in acrylic because it's fast, then want to render the focal point in oils because they're richer. Fine. Just give the acrylic the time it needs to fully off-gas, or your cinematic lighting turns into a cracked mosaic before the client even ships the print.
Acrylic and oil can work together when the order is deliberate. Acrylic can establish a drawing, a broad value pattern, or a colored ground. Oil can then add the slower, more nuanced passages: transparent shadows, scumbled texture, softened transitions, and the particular depth that comes from manipulating a wet film. But the transition should feel like a change of material, not a race between them. Keep the acrylic passages thin enough to cure properly, avoid burying damp layers under oil, and do not assume that a fast first stage gives permission to rush the second.
Modifying Paint for Glossy Grounds and Surface Adhesion
Sometimes the ground isn't what you planned. Acrylic grounds dry glossy. That's chemistry, not failure. But glossy surfaces are adhesion nightmares for oil paint — the paint sits on top instead of biting in, and your carefully built highlight sits one nudge away from sliding off the panel mid-render.
The workaround lives in the paint, not the ground. If an acrylic ground is too glossy for oil paint adhesion, the oil paint should be modified with at least 5% alkyd medium or 10% linseed oil to increase its grip. The added oil increases the paint's tack and gives it something to lock onto. It's a small adjustment in the medium that prevents a catastrophic adjustment later when a layer separates across the entire piece.
This is not an invitation to flood the surface with oil. More medium does not automatically mean more adhesion, and an overly rich mixture can create a slow-drying, slippery passage that complicates every layer after it. Add the minimum needed to change the handling, then judge the result on a test area. The paint should move with control and remain attached when lightly brushed after it has set.
Gloss can also make a passage look darker or more saturated than it will appear once the surface is later unified. That is a visual problem as well as a mechanical one. When judging an underpainting, look at the value structure under consistent light rather than letting a wet sheen convince you that a dark is deep enough or a highlight bright enough. Surface reflection can disguise a weak value map.
For paper-based supports, the principle scales up. Raw paper needs both a PVA size — to seal the fibers against oil damage — and an acrylic gesso ground — to give the paint a stable surface. Skip either and you've got paint eating paper. Do both and you've got a support that handles oil as well as any panel — useful for illustrators who like the bite of a paper tooth under their wash stages.
The composition isn't decided in the final layers. It's decided in the prep — every barrier, every medium ratio, every drying window is a narrative choice you can't undo later.
A glossy ground is not always unusable. It simply demands more attention to the first oil layer. If the surface is already prepared and the painting has to proceed, modifying the paint can improve the initial grip. If the ground is excessively slick, however, the better decision may be to correct the surface before beginning the image. Lightly changing the surface texture is a different intervention from changing the paint mixture, and it should be tested before it is applied to the actual panel.
Pre-Session Checklist
Before the first brushstroke of color goes down, run this. Print it. Tape it to the easel. Treat it like a storyboard for the painting's structural setup.
1. Sketch sealed. Graphite lifted with kneaded eraser, then locked with a fixative whose manufacturer confirms oil-paint compatibility — sprayed from 12–15 inches. No acrylic gesso over raw pencil.
2. Wash medium binder-loaded. 50 / 50 Galkyd and Gamsol. Never solvent alone. Fat-over-lean honored from this layer up.
3. Support sealed. 1:1 dammar varnish and OMS on rigid panels, applied with a sponge wedge. PVA size plus acrylic gesso on paper.
4. Acrylic fully cured. Thin layers: 3 days minimum. Thick layers: 2–3 weeks. “Dry to touch” doesn't count.
5. Paint modified for the ground. At least 5% alkyd medium or 10% linseed oil added when working over a glossy acrylic surface.
6. No oil-under-acrylic anywhere. Acrylic goes under oil, or acrylic stays acrylic. Never the reverse.
7. Drying environment stable. Consistent temperature, low dust, no direct sun on the wet layers. The painting doesn't care about your deadline.
Check all seven and the underpainting has the structural integrity to support whatever focal point, whatever lighting, whatever character beat you throw at it in the color stages. Skip one and the painting will find the weakness — eventually, visibly, irreversibly.
The list is most useful before the session, not after something starts misbehaving. Once the wash is chalking or a glossy passage is sliding under the brush, the available fixes become more disruptive. A few minutes spent checking the support, the medium, and the previous layer is cheaper than repainting a focal point that lost its edge because the foundation was never stable.
Where Prep Meets the Painting
The romance of illustration lives in the final render — the focal point, the dramatic light, the character moment that sells the cover. The mechanics live three layers beneath that, in materials most viewers will never think about. That's precisely why they matter. The audience reads the story; the illustrator builds the stage. A traditional fantasy oil painting intended to remain stable over time rests on these unglamorous choices: the sealed graphite, the bound wash, the patient drying window, the medium ratio that doesn't show up in the final image but holds every pixel of it in place.
Talent doesn't save a bad ground. Hard work, executed at the prep stage, gives talent something to stand on. The underpainting preparation checklist is not a ritual to perform before the real painting begins. It is the first part of the painting — the part that determines how confidently the later decisions can survive.